sass, scss
- Sass, also known as the indented syntax
- SCSS, a CSS-like syntax
Initially, Sass was part of another preprocessor called Haml, designed and written by Ruby developers.
// Variable
!primary-color= hotpink

// Mixin
=border-radius(!radius)
  -webkit-border-radius= !radius
  -moz-border-radius= !radius
  border-radius= !radius

.my-element
  color= !primary-color
  width= 100%
  overflow= hidden

.my-other-element
  +border-radius(5px)
// Variable
$primary-color: hotpink;

// Mixin
@mixin border-radius($radius) {
  -webkit-border-radius: $radius;
  -moz-border-radius: $radius;
  border-radius: $radius;
}

.my-element {
  color: $primary-color;
  width: 100%;
  overflow: hidden;
}

.my-other-element {
  @include border-radius(5px);
}
Pros for Sass Indented Syntax
- No need for @mixin or @include, when a single character is enough: = and +.
- the Sass syntax enforces clean coding standards by relying on indentation.
Pros for SCSS Syntax
- you can rename a CSS file in .scss and it will just work, but sass can’t.
- easier to read
- ittle to no learning curve.
Reference from
OOCSS(Object Oriented CSS)概要とその具体的な書き方
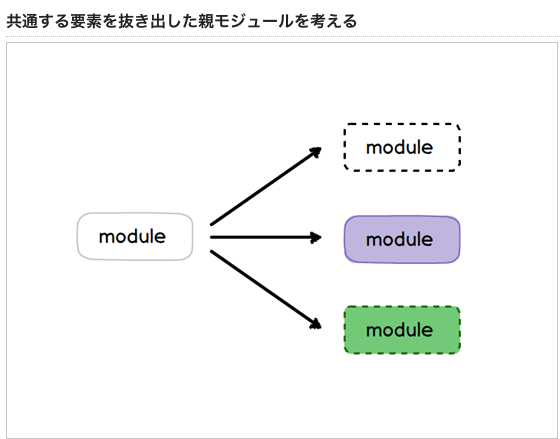
枠とモジュールという考え方
- 枠 モジュールをはめ込んでいくための枠組み
- モジュール レゴや積み木などの1ピース(部品)
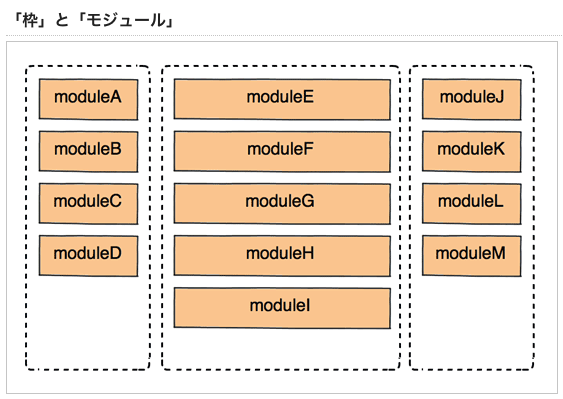
- モジュール名さえかぶらなければスタイルの競合が起きない
- モジュールの一覧を作る
モジュールの命名、抽象的(汎用的)⇄具体的(汎用性は低い)
.mod-moduleA なにかのモジュール それが何のモジュールか情報がない
.mod-itemblock  商品を表示するブロック
.mod-relateditems   関連する商品 関連するもの以外が入るかもしれない
.mod-relatedbooks   関連する書籍 書籍以外の商品が入るかもしれない
.mod-relatedbooknav 関連する書籍のナビゲーション ナビゲーションのリンクはないかもしれない
.mod-amazonnav  アマゾンのナビゲーション アマゾンへのリンクはないかもしれない
汎用性と具体性のバランスをどうとるのか
求められるのは、場合にもよりますが、多くのケースで具体的すぎず、抽象的すぎない名前 最低限、そのモジュールがどんな役割を持っているのか伝わる程度
微調整のための便利なクラス
.ex-align-r { text-align:right; }
.ex-align-l { text-align:left; }
.ex-align-t { vertical-align:top; }
.ex-align-b { vertical-align:bottom; }
モジュールとスキンという考え方
<span class="buttonbase twitterbutton">
  Twitter
</span>
<span class="buttonbase facebookbutton">
  Facebook
</span>
/* モジュール */
.buttonbase {
  border:5px solid white;
  border-radius:10px;
  padding:.2em .5em;
  color:white;
  display:inline-block;
  margin:0 10px;
}

/* スキン */
.twitterbutton {
  background:red;
}
.facebookbutton {
  background:blue;
}
共通部分を「モジュール」としてまとめ、差異は「スキン」としてまとめると、クラス名をみたときにコンテンツの内容もある程度なら推測ができるし、しかもCSSも効率的に書くことができる
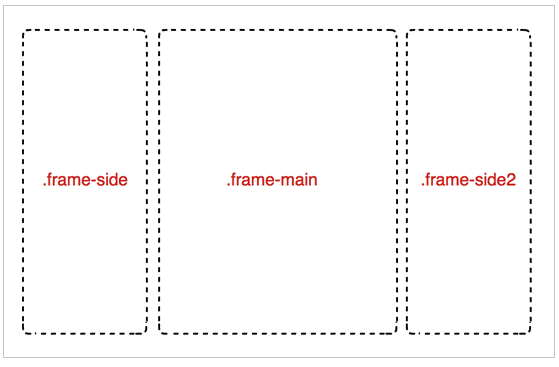
[Separate container and content] (https://github.com/stubbornella/oocss/wiki#separate-container-and-content) (コンテナとコンテントを分離)
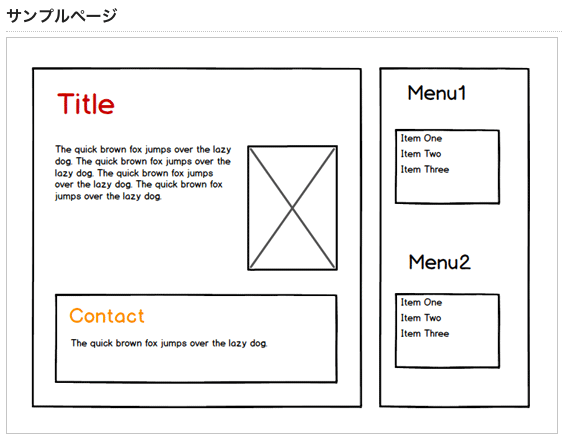
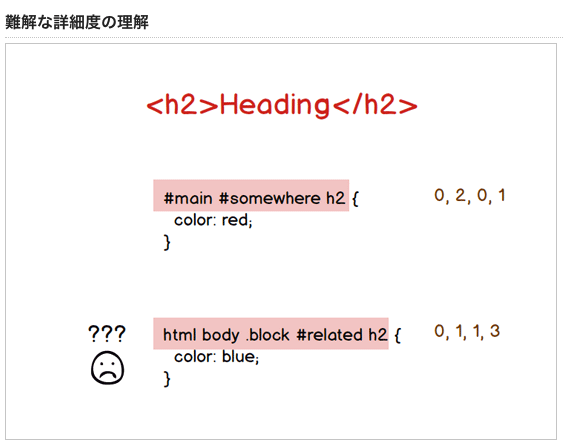
メインエリアにある見出しは、#mainのh2 問い合わせブロックにある見出しは、.contactの中にある、.header以下にあるh2 サイドバーにあるMenu1やMenu2などの見出しは、#sidebar以下のh2
#main h2 {
}
#main .contact .header h2 {
}
#sidebar h2 {
}
.somewhere .title h2 {
}
場所に依存した指定方法だからダメ、以下のような問題が発生する
Essentially, this means “rarely use location-dependent styles”.
- 上書き合戦(h2をいろいろなところで使うとすれば、このh2に当てたスタイルを、部分的に上書きする必要が出てくる)
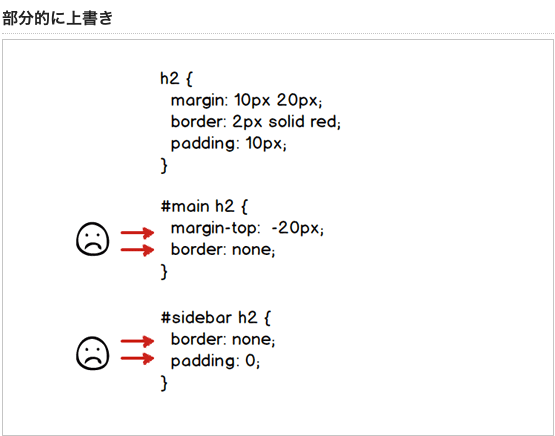
- コピー(見栄えが同じ見出しがいろいろなところに登場した場合、それぞれのh2を含むセレクタについて、同じスタイルの指定をコピーして使わなければならなくなってしまうかもしれない)
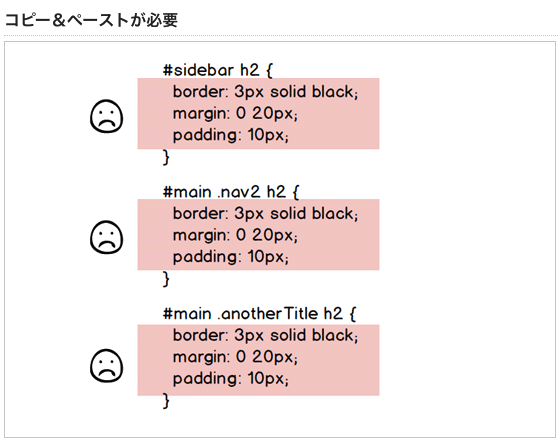
→ 当てたいスタイルの詳細度が、競合しているどこかのスタイルよりも低ければ、自分の書いたスタイルは反映されない
Webページを、レゴの集まりで考える
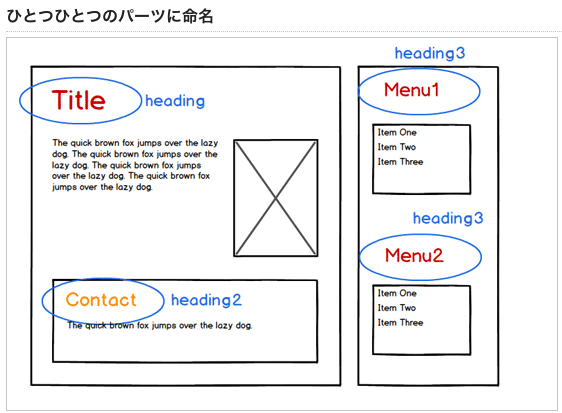
<h2 class="heading">Title</h2>
<h2 class="heading2">Contact</h2>
<h2 class="heading3"><span>Menu1</span></h2>
<h2 class="heading3"><span>Menu2</span></h2>
/* heading module */

.heading {
  prop: val;
}

/* heading2 module */

.heading2 {
  prop: val;
}

/* heading3 module */

.heading3 {
  prop: val;
}
  .heading3 > span {
    prop: val;
  }
OOCSSでは、このひとつひとつのレゴのパーツをCSSオブジェクト(= モジュール)とする。
Basically, a CSS “object” is a repeating visual pattern, that can be abstracted into an independent snippet of HTML, CSS, and possibly JavaScript. That object can then be reused throughout a site.
https://github.com/stubbornella/oocss/wiki#whats-a-css-object
同じパーツを二度コーディングする必要がなくなる。
[Separate structure and skin] (https://github.com/stubbornella/oocss/wiki#separate-structure-and-skin) (ストラクチャとスキンの分離)
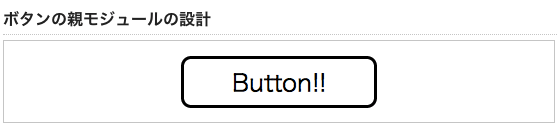
<span class="button">Button!!</span>
.button {
  font-size:1.5em;
  padding:.5em 2em .4em;
  border:3px solid #000;
  border-radius:10px;
}
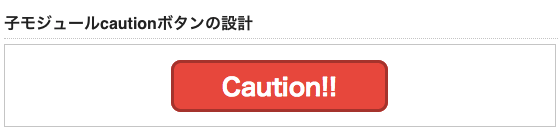
<span class="button caution">Caution!!</span>
.caution {
  font-weight:bold;
  color:#fff;
  background:#FD3636;
  border-color:#BC2828;
}
BAD pattern
<span class="cautionButton">Caution!!</span>
.cautionButton {
  font-size:1.5em; /* 共通 */
  padding:.5em 2em .4em; /* 共通 */
  border:3px solid #000; /* 共通 */
  border-radius:10px; /* 共通 */
  font-weight:bold;
  color:#fff;
  background:#FD3636;
  border-color:#BC2828;
}
基本となるストラクチャに、スキンを適用して具体的な見栄えを作る 重要なのは、モジュールの関係を「ストラクチャ」と「スキン」で整理すること
まとめ
CSSオブジェクトをストラクチャとスキンに分けて整理する。
Reference from
https://app.codegrid.net/entry/frames-and-modules https://github.com/stubbornella/oocss/wiki https://app.codegrid.net/entry/oocss-1 https://www.slideshare.net/stubbornella/object-oriented-css
デザイン、現場の手法
chapter1 デザインの作法
- デザインにゴール地点を設定する
- どうすればデザイン案にOKが出るか、クライアントが期待している何か(要望)を正確に聞き出す
- レイアウトは枠組みから、最初にデザインの設計を済ませて、作るものの仕上がりに近いサイズの紙を用意して、手書きを鉛筆でする
- マーケティングの基礎を知っておく
- ビジネスマンとしてクライアントの置かれている環境や立場を理解して本当に必要とされるデザインを考えるためにもデザイン以外の分野の勉強も怠らないようにする。
- デザイン案の見せ方
- 選択肢が一つしか二つしかないと選ばされていると感じてしまうので、デザイン案は3~5案が適当。対抗案に求められるのは本命案に足りなかったものを表現すること
- デザインの説明責任
- そのデザインでどんな利益を生み出せるのかを言葉や文章で表す、クライアントの立場に立ってデザインを考える。
- デザイン料の算出
- 減ることはあっても増えることはない
chapter2 ワークフローの作法
- 指示書でわかるマネージメント力、何のための指示書なのか考える、簡潔にする、KISS、赤字を入れるときは細かい指示(hoge px右にする)ではなく、ゴール(どうしたいのか、ここと揃える)を説明する
- 打ち合わせは準備と成果、何のためにどんな問題を解決しようとしているのかの認識をすり合わせる
- 何はなくともバックアップ
- ファイルを渡すときは基本汎用フォーマット( どんな環境であっても開ける一般的なファイル形式=汎用フォーマットを使うべき ) PDF
- コミュニケーションエラーをなくす。クリエイティブな業種ほど自尊心が強く、客観性が低いという傾向があるが、一方持続性が高く、情感は豊かという面を持ち合わせているのが特徴。ちゃんときちんと聞く。相手の言葉を傾聴していることを態度や言葉で示すことが肝心。
chapter3 画像データの作法
- JPEGの保存を繰り返さない(開くのはOK)、劣化するから。非可逆式圧縮だから。
- 写真の著作権はクライアントではなく、カメラマンにある。著作権管理体制が複雑になる。どのような条件で写真撮影やデザインを行うのか契約書の形にしておくことが望ましい。
- インパクトのある写真の選び方、意外性がある・スケール感・鮮烈な色や形
chapter4 フォントの作法
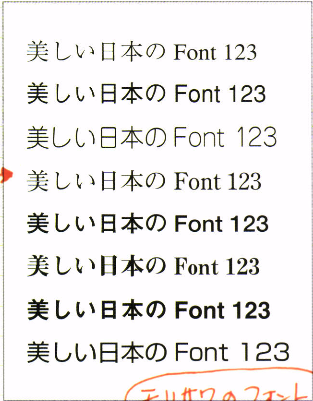
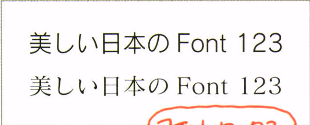
和文フォント
モリサワの基本書体、基本7書体 + 新ゴ
- リュウミンL-KL
- 中ゴシックBBB
- じゅん101 」本文組み
- 太ミンA101
- 太ゴB101
- 見出しミンMA31
- 見出しゴMB31 」見出しなどに適している
新ゴR
- ヒラギノ角ゴシック体(Mac OS X)

- 太い、細い、大きい、小さい テキストは選択するフォントの線の太さとその大きさとによって重さが決まる。 重さ=テキストがどれだけ目立つか テキストはサイズが大きいほど、また線が太いほど目立つ
太さはトーンで大きさは音量 柔らかさの演出 太い文字を使わずに線の細い書体を組み合わせる 目立たせたい場合 音量を大きく、つまり文字のサイズを大きくする 小見出しなど大きな声は出しにくいけれど目立たせたいと言った場所には、太いトーンの声、サイズは小さいけれど太い文字
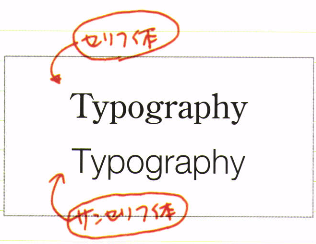
欧文フォント
欧文フォントは爪状の飾りがついたセリフ体と飾りのないサンセリフ体がある セリフ体 古く伝統的な印象 サンセリフ体 比較的モダンでシャープなイメージ
上記二種類以外
スクリプト体 手書きの文字をデザインした書体

ディスプレイ体 看板やポスターなどで目立つために作られた書体
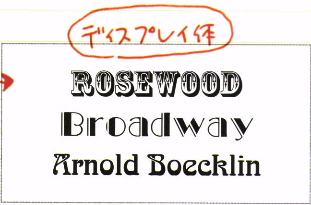
ゴシック体 強い直線のラインと装飾的なセリフを持つ書体で、古典書でよく使われていた。

用法に注意が必要なフォントもある - イタリック体、そのフォントの正立書体の中で引用など一部の語句を強調したり、別の国の言語を区別するため。

- カリグラフィフォント、メッセージ性の強いイメージがあり、客観性を重視したいデザイン(ビジネスやニュース)には向かない
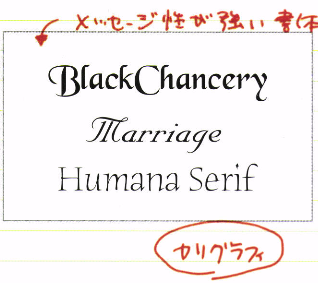
- Xハイトとかカウンターで、だいぶ印象が変わる
- 記号や人名は異体字から選ぶ
所感
- デザイナーがどんなことをやっているかといったことを具体的に知ることができた
- 技術書と違って挿絵が豊富で綺麗だった笑、技術書ならソースコードだが
- たまには無心でロゴがまとめられた記事をペラペラ見るのも悪くないかもしれない
- 欧文フォントのあたりとかは面白かった
- あと文字の太さとか大きさとかはHTMLコーディングするときにつかえそうだと思った。
- デザインの勘所を身につけるという意味だと結局ユーザーに合わせて使いやすいようなものを作るのがデザインだと感じた。
TODO
- [ ] TIME MACHINE の設定
git commit --amend 二つ以上前のcommit の編集方法、丁寧に解説
fugaのcommit messageを編集したい。
$ g log --oneline
068bc0b bar
19b06a6 fuga
6f04c12 hoge
rebaseする。
$ git rebase -i HEAD~3
vimが開くので、該当コミットをpickからeに変えて保存(:wq)
pick 6f04c12 hoge
- pick 19b06a6 fuga
+ e 19b06a6 fuga
pick 068bc0b bar

# Rebase 51268e2..068bc0b onto 51268e2 (3 commands)
#
# Commands:
# p, pick = use commit
# r, reword = use commit, but edit the commit message
# e, edit = use commit, but stop for amending
# s, squash = use commit, but meld into previous commit
# f, fixup = like "squash", but discard this commit's log message
# x, exec = run command (the rest of the line) using shell
etc
そうするとvimが閉じてこれが出る
Stopped at 19b06a6... fuga
You can amend the commit now, with

        git commit --amend

Once you are satisfied with your changes, run

        git rebase --continue
rebaseすると終わってしまうので、git commit –amend をする。
$ g commit --amend
またvimが開くので変えたい箇所を編集
+ changed fuga
- fuga

# Please enter the commit message for your changes. Lines starting
# with '#' will be ignored, and an empty message aborts the commit.
#
# Date:      Wed Aug 2 08:17:54 2017 +0900
#
# interactive rebase in progress; onto 51268e2
# Last commands done (2 commands done):
#    pick 6f04c12 hoge
#    e 19b06a6 fuga
# Next command to do (1 remaining command):
#    pick 068bc0b bar
etc
確認するとHEADはchanged fugaになっている
$ g log --oneline
275e529 changed fuga
6f04c12 hoge
最後に忘れずにrebase continue
$ g rebase --continue
Successfully rebased and updated refs/heads/master.
やったー、編集できた!!
$ g log --oneline
e0feff0 bar
275e529 changed fuga
6f04c12 hoge
まとめ
$ git rebase -i HEAD~3
$ g commit --amend
$ g rebase --continue
Reference from
Git ふたつ以上前のコミットには commit --amend できないの? - Qiita git rewrite history - How to modify a specified commit in git? - Stack Overflow
Overview of terraform
Getting Started
Install
$ brew install terraform
Configuration
provider "aws" {
  access_key = "ACCESS_KEY_HERE"
  secret_key = "SECRET_KEY_HERE"
  region     = "us-east-1"
}
resource "aws_instance" "example" {
  ami           = "ami-2757f631"
  instance_type = "t2.micro"
}
Execution Plan and Apply
$ terraform plan

# create real resources
$ terraform apply

# the terraform.tfstate file maps various resource metadata to actual resource IDs so that Terraform knows what it is managing.
# You can inspect the state using terraform show

$ terraform show
- https://www.terraform.io/docs/commands/apply.html
- https://www.terraform.io/docs/commands/plan.html
- https://www.terraform.io/docs/commands/show.html
Change Infrastructure
resource "aws_instance" "example" {
+ ami           = "ami-2757f631"
- ami           = "ami-b374d5a5"
  instance_type = "t2.micro"
}
Destroy Infrastructure
# verify exactly what resources Terraform is managing and will destroy
$ terraform plan -destroy

# destroy the infrastructure
$ terraform destroy
Resource Dependencies
resource "aws_instance" "example" {
  ami           = "ami-b374d5a5"
  instance_type = "t2.micro"
}

# This resource type allocates and associates an elastic IP to an EC2 instance.
# The only parameter for aws_eip is "instance" which is the EC2 instance to assign the IP to.

resource "aws_eip" "ip" {
  instance = "${aws_instance.example.id}"
}
Implicit and Explicit Dependencies
#  you can also specify explicit dependencies with the depends_on parameter which is available on any resource.

resource "aws_eip" "ip" {
  instance   = "${aws_instance.example.id}"
  depends_on = ["aws_instance.example"]
}
# If you're ever unsure about the dependency chain that Terraform is creating, you can use the terraform graph
$ terraform graph
Defining a Provisioner
Provisioners are used to execute scripts on a local or remote machine as part of resource creation or destruction.
resource "aws_instance" "example" {
  ami           = "ami-b374d5a5"
  instance_type = "t2.micro"

  provisioner "local-exec" {
    command = "echo ${aws_instance.example.public_ip} > ip_address.txt"
  }
}
$ cat ip_address.txt
54.192.26.128
Defining Variables
variable "access_key" {}
variable "secret_key" {}

# If a default value is set, the variable is optional.
variable "region" {
  default = "us-east-1"
}
# Using Variables in Configuration
provider "aws" {
  access_key = "${var.access_key}"
  secret_key = "${var.secret_key}"
  region     = "${var.region}"
}
Assigning Variables
# Command-line flags
$ terraform plan \
  -var 'access_key=foo' \
  -var 'secret_key=bar'
access_key = "foo"
secret_key = "bar"
$ terraform plan \
  -var-file="secret.tfvars" \
  -var-file="production.tfvars"
Lists
# implicitly by using brackets [...]
variable "cidrs" { default = [] }

# explicitly
variable "cidrs" { type = "list" }
cidrs = [ "10.0.0.0/16", "10.1.0.0/16" ]
Maps Maps are a way to create variables that are lookup tables.
variable "amis" {
  # A variable can have a map type assigned explicitly, or it can be implicitly declared as a map by specifying a default value that is a map.
  type = "map"
  default = {
    "us-east-1" = "ami-b374d5a5"
    "us-west-2" = "ami-4b32be2b"
  }
}
resource "aws_instance" "example" {
  ami           = "${lookup(var.amis, var.region)}"
  instance_type = "t2.micro"
}
$ terraform plan -var 'amis={ us-east-1 = "foo", us-west-2 = "bar" }'
variable "region" {}
variable "amis" {
  type = "map"
}
amis = {
  "us-east-1" = "ami-abc123"
  "us-west-2" = "ami-def456"
}
$ terraform apply -var region=us-west-2

Apply complete! Resources: 0 added, 0 changed, 0 destroyed.

Outputs:

  ami = ami-def456
Defining Outputs
Outputs are a way to tell Terraform what data is important. This data is outputted when apply is called, and can be queried using the terraform output command.
output "ip" {
  value = "${aws_eip.ip.public_ip}"
}
Viewing Outputs
$ terraform apply
Apply complete! Resources: 0 added, 0 changed, 0 destroyed.

Outputs:

  ip = 50.17.232.209
$ terraform output ip
50.17.232.209
Modules
provider "aws" {
  access_key = "AWS ACCESS KEY"
  secret_key = "AWS SECRET KEY"
  region     = "AWS REGION"
}

# The module block tells Terraform to create and manage a module.
module "consul" {
 # The source configuration is the only mandatory key for modules. It tells Terraform where the module can be retrieved.
 source = "github.com/hashicorp/consul/terraform/aws"

  key_name = "AWS SSH KEY NAME"
  key_path = "PATH TO ABOVE PRIVATE KEY"
  region   = "us-east-1"
  servers  = "3"
}
# Prior to running any command such as plan with a configuration that uses modules, you'll have to get the modules.

$ terraform get

# The terraform get command is used to download and update modules mentioned in the root module.
https://www.terraform.io/docs/commands/get.html
- https://www.terraform.io/docs/modules/index.html
- http://qiita.com/zembutsu/items/1e4424314a0ad98bcc40
Remote Backends - In production environments it is more responsible to run Terraform remotely and store a master Terraform state remotely. - Terraform Enterprise allows teams to easily version, audit, and collaborate on infrastructure changes. - functions as a Terraform backend as well as enabling many other features such as remote apply, run history, state history, state diffing, and more
githubのterraform版みたいな感じ?
# configure the backend in your configuration
terraform {
  backend "consul" {
    address = "demo.consul.io"
    path    = "getting-started-RANDOMSTRING"
    lock    = false
  }
}
# After configuring a backend, run terraform init to setup Terraform.

$ terraform init
$ terraform plan

# ...

No changes. Infrastructure is up-to-date.

This means that Terraform did not detect any differences between your
configuration and real physical resources that exist. As a result, Terraform
doesn't need to do anything.

# Terraform is now storing your state remotely in Consul.
Terraform Enterprise
$ export ATLAS_TOKEN=ATLAS_ACCESS_TOKEN
terraform {
  backend "atlas" {
    name = "USERNAME/getting-started"
  }
}

# Note that the backend name is "atlas" for legacy reasons and will be renamed soon.
$ terraform init
$ git init
$ git add example.tf
$ git commit -m "init commit"

# push your Terraform configuration to Terraform Enterprise

$ terraform push
This will automatically trigger a terraform plan, which you can review in the Terraform page. If the plan looks correct, hit “Confirm & Apply” to execute the infrastructure changes.
所感
- consul使ってみたい
- Modules, Terraform Enterprise, Provisioner使ってみたい
- でもこの辺使い出したらもう仕事関係ないんだよなー笑
- Terraform Enterpriseのページがかっこよかった